Lumbar facet joint denervation technique
It is unclear how effective RFD is at relieving LBP. NICE 2016 (NG59) guidance 1) on LBP recommends RFD as a treatment option for people with suspected facetogenic LBP who fail to respond to conservative treatment and respond positively to medial branch blocks (MBBs). A subsequent (2017) Dutch study (MINT), found no benefit from the addition of RFD to an exercise program for people with LBP who had responded positively to a MBB 2).
The MINT study was heavily criticized for multiple reasons, including the utilization of a sub-optimal lumbar facet joint denervation technique, which was inconsistently delivered 3) 4).
The described technique of RFD varies between published studies 5) 6) 7) 8).
The British Pain Society (BPS) and Faculty of Pain Medicine (FPM) Standards of good practice for MBB injections and RF published in March 2014 provide the broad framework for delivery of RFD and patient selection but do not specify the technical detail of needle placement, lesion temperature, duration or choice of joint level 9).
The Spine Injection Society guidelines are widely adopted by most but not all practitioners. Furthermore, the technique is published in the society’s book and only available on payment of a fee 10).
Positioning the RF cannula
1. Identify the L5-S1 disc interspace. 2. Identify the L5 vertebral body. 3. Rotate the image intensifier laterally to visualise the bony curvature between the transverse and the articular process. Occasionally, the curvature is visible in the AP view and no lateral rotation is necessary. 4. Once the curvature is identified, tilt the image intensifier inferiorly keeping the curvature clearly in view. 5. Tilt the image intensifier so as to view curvature as medially and inferiorly as possible. 6. Once the above view is achieved, local anaesthetic is infiltrated at the skin entry point. This is in a line directly below curvature at lower border of transverse process of the same level. 7. Aim to contact bone below curvature. 8. Advance your RF cannula in a posterolateral view needle at 4 o’clock or 8 o’clock depending on right or left side. The target is the middle two-fourth of the lateral aspect of the articular process aiming to contact the medial branch before it courses under the mammillo-accessory ligament in a trajectory parallel to the nerve. 9. Once the RF cannula is in position, use the tunnel view to confirm needle in curvature on bone. 10. Use the superior (cranial tilt) view with needle at 6 o’clock to assess depth of the cannula 11).
Be very familiar with the lumbar medial branch of the posterior primary ramus - this is your target!
For facet denervation, target the medial branches at the levels you want to treat together with the medial branch to the level above.
L1/L2 T12, L1, L2
L2/L3 L1 L2 L3
L3/L4 L2, L3, L4
L4/L5 L3, L4, L5
L5/S1 L4, L5, S1
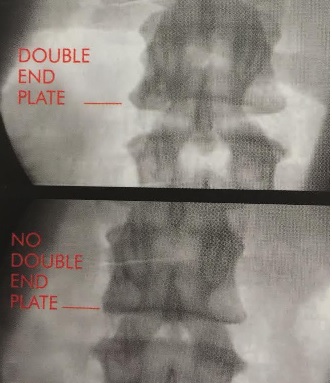
In prone position on a radiolucent table; stand on the left side of the patient if you are right-handed and vice-versa if you are left-handed. With the C Arm image intensifier in the postero-anterior axis, obtain a clear view of the lumbar vertebrae; if necessary, adjust the position of the image intensifier so as to obliterate any double end-plates.
This is done by angling the image intensifier, which is in the postero-anterior axis, very slightly caudally. This manoeuvre results in the lower border becoming a single line on X-ray screening
Occasionally, the double-end plate is removed by moving the axis of the C-arm image intensifier very slightly cranially. The best place to start trying to locate the medial branch of the posterior primary ramus is the point where it enters the groove on the back of the vertebral lamina.
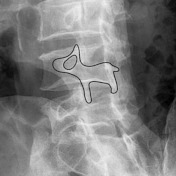
For this you need to move the image intensifier from its initial postero-anterior axis (corrected for 'double end-plates') obliquely away from the patient so as to obtain a good view of the so-called 'Scottie dog'. Your preliminary target is the 'eye of the dog'
Use a 25G needle to infiltrate the superficial tissues only; do not go down as far as bone, as you will anaesthetise the medial branch and be unable to locate it by stimulation. Insert a 22G, 100.5mm (5mm exposed tip) RF needle along the angle of the X-ray beam so as to hit the 'eye of the Scottie dog' in tunnel vision
Replace the RF needle stilette with the thermocouple electrode and try to locate the medial branch by sensory stimulation, using the following parameters on your machine:
Frequency; 50Hz Pulse width; l ms Voltage; up to 0.5V
NB If you only manage to locate the nerve at a voltage greater than 0.5V - keep looking! You are unlikely to produce an effective lesion here.
If you cannot locate the nerve on bone, then slip forward off bone and into the groove close to the intervertebral foramen
and try again. If you still cannot locate the nerve, advance deeper and very slowly checking the position of your needle in the lateral axis.
The tip of your needle must newer lie anterior to an imaginary line passing through the posterior margin of the intervertebral foramen
If you lesion anterior to this point, you run the double risk of causing neuritis and of damaging the motor root. As you gain experience in the technique, you may decide to slip forward into the groove from the 'eye of the Scottie dog' as a matter of routine. Locating the nerve in the groove means that you are using the shaft of the needle as opposed to its tip and many workers consider to be a better way of obtaining a permanent lesion (see chapter on 'The physics of radiofrequency'). Once you have achieved localisation by sensory stimulation, test for motor stimulation using the following parameters on your machine:
Frequency; 2Hz Pulse width; I ms Voltage; double the sensory threshold but at least I V
NB it is very common to see localised contractions around the needle area (due to stimulation of the Multifidus muscle by the motor component of the medial branch); these can safely be ignored. You are on the lookout for rhythmical contractions in the lower limb. Should these appear, reposition the needle.
You are now ready to carry out a lesion. Preset the timer to 60 seconds. Preset the temperature maximum to 85°C. Remove the thermocouple electrode and inject l ml of 2% Lidocaine through the needle. Replace the electrode. Switch your machine to lesion mode and gradually increase the power, which will in turn cause a temperature rise. When the temperature reaches 80`C, switch the timer on, in order to create the lesion. When the lesion has been performed, remove the electrode and inject 1 ml of a mixture of 0.5% Bupivocaine plus a depot steroid preparation in order to reduce post procedure discomfort.
The medial branch of the L5 posterior primary ramus
Your target here is slightly different. With the image intensifier in the postero-anterior axis, visualise the sacrum; your target is the junction between the superior articular process and the upper surface of the lateral part of the sacrum
; very often you can locate the medial branch here without needing to move the image intensifier off the postero-anterior axis; instead, you may find it useful to angle your needle, departing from strict 'tunnel vision'.
Hunt for the nerve as already outlined above.
If you cannot locate the nerve on bone, then slip forward off bone and into the groove close to the intervertebral foramen and try again. If you still cannot locate the nerve, advance deeper and very slowly checking the position of your needle in the lateral axis. The tip of your needle must never lie anterior to an imaginary line passing through the posterior margin of the L5 intervertebral foramen.
If you lesion anterior to this point, you run the double risk of causing neuritis and of damaging the motor root. As you gain experience in the technique, you may decide to slip forward into the groove from bone as a matter of routine. Locating the nerve in the groove means that you are using the shaft of the needle as opposed to its tip and many workers consider to be a better way of obtaining a permanent lesion (see chapter on The science of radiofrequency').
Branch from S1
This lies just lateral to the Si foramen.
You do not need a motor test at this point.
Using diagnostic anesthetic blocks, the lumbar facet joint has been shown to be the primary cause of pain in approximately 15% of patients with chronic low back pain.
Lumbar RFN can be very effective when performed in a rigorous manner in appropriately selected patients. Chronic back pain, mediated by the lumbar medial branches, can be stopped and patients fully restored to normal living, if treated with RFN 12).
The prevalence of zygapophysial joint pain appears to be 7% in patients with failed back surgery syndrome. Patients with this condition can be treated with a radiofrequency neurotomy with a success rate of 58.8% 13).
Radiofrequency neurotomy (RFN) of the lumbar medial branch innervating the zygapophysial joint has been shown to provide a significant decrease in pain in patients selected by dual comparative anesthetic blocks, but quantitative improvements in mobility have not been fully elucidated. A theoretical concern with RFN is that the multifidus muscle, a stabilizing paraspinal muscle, is also denervated during this procedure, which may have adverse effects on mobility and spine stability 14).
In CLBP of facet origin, shifting the target of percutaneous radiofrequency to the facet joint capsule provides an easier technique with an extended period of pain relief compared to the medial dorsal branch of the facet joint 15).


